Cookies with Kids

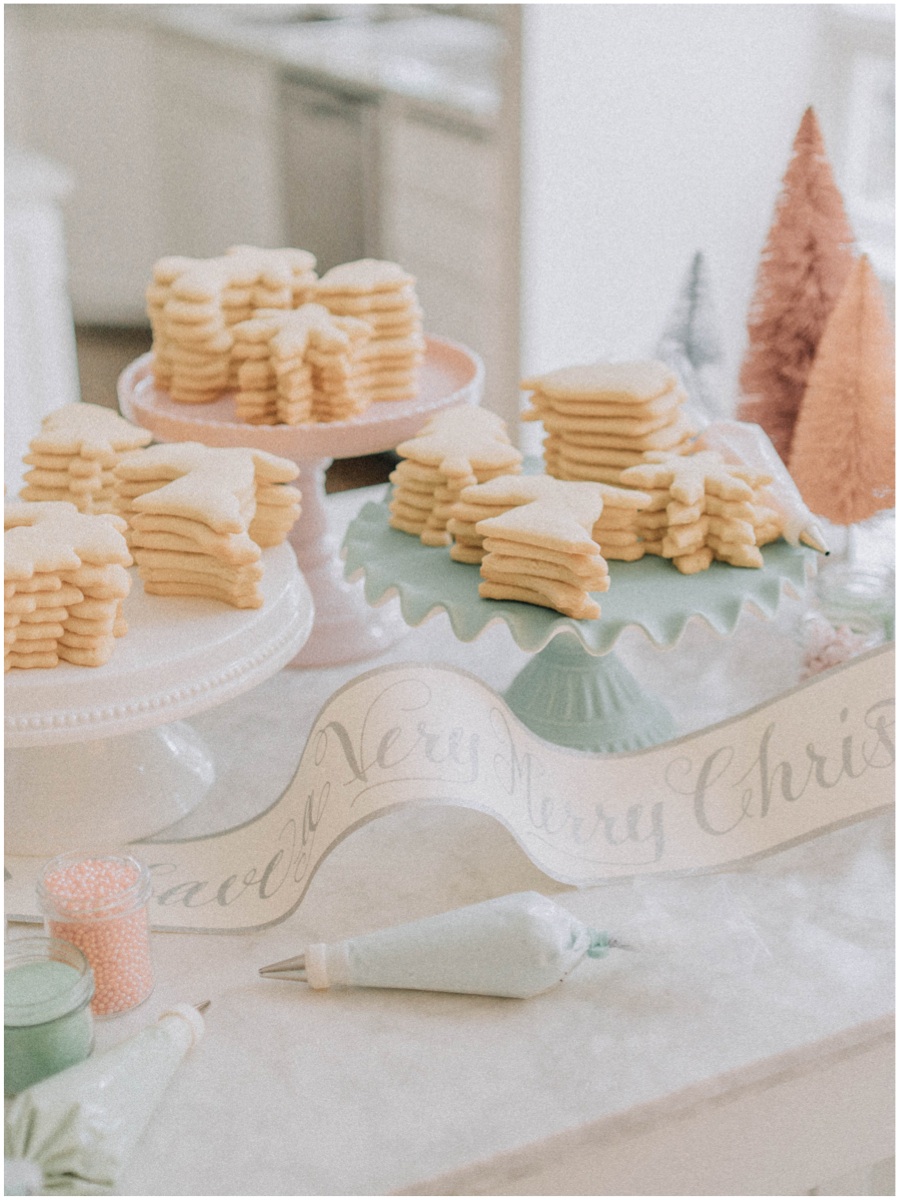
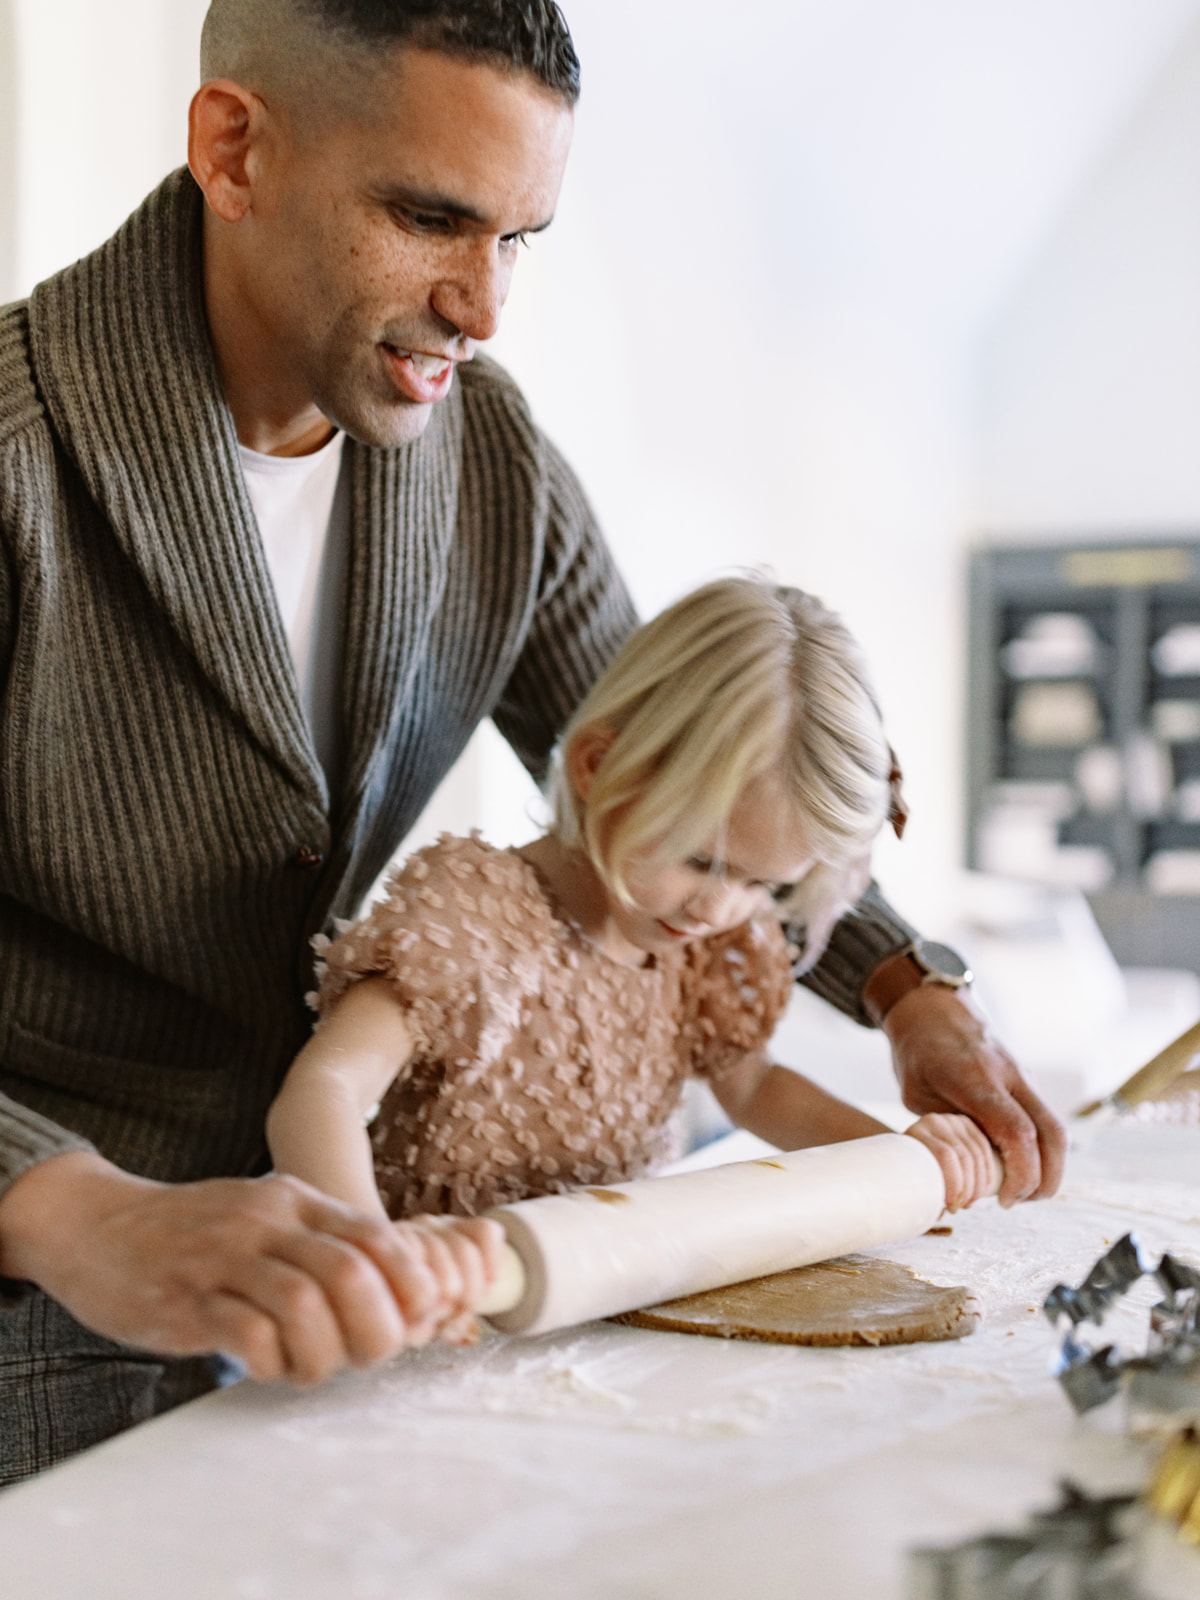
One of the best parts of the holidays is sharing the magic of the season with friends.  Every year we get together with our good friends Christiana and Todd and their kids and decorate cookies together. I still remember our first cookie party five years ago when there was only one kid decorating cookies. Jamie and I didn’t have any kids of our own, but we set up the party for our friend’s daughter because we knew she would love it. Times have changed and our families have grown! We now have five kids standing around our kitchen island decorating cookies, and next year there will be seven kids between our two families! We definitely believe the more the merrier… but we have also come to realize the more the messier! We don’t mind the kids making a mess, but we have discovered that the kids have more fun when things are a bit more organized and don’t feel as chaotic. We’ve learned a few things over the years about hosting a cookie party and thought we would share a few of our tips! Make the Dough! Use a good recipe for making your dough! We have previously posted Jenny Cookie’s sugar cookie recipe here  in addition to the best soft gingerbread cookies here. Make the dough early enough so you have time to roll your cookies out the day before your cookie party!

On another note… you could skip this step altogether! Check with your local bakery or grocery store to see if they have cookie decorating kits where you can just purchase fresh baked cookies directly from the store! Lets be honest… sometimes there just isn’t time to do all the baking yourself, and thats ok!

Roll it out! Roll the cookies out before all of the kids arrive! We used to have all of the kids participate in rolling out cookies. While it is fun to do with one or two kids, rolling out cookies with five kids, is tough. We found that they had a hard time being patient through rolling enough cookies to actually decorate and then waiting for them to bake and then cool. Most kids are really excited about adding the frosting and the sprinkles, so baking the cookies ahead of time allows the kids to do what they really love most!

I rolled out most of the cookies myself, but it sure was fun to have my little buddy next to me rolling out a little bit of dough and experimenting with how to use a rolling pin!

 3. The icing on the cookie! While I love the look of smooth royal icing on a sugar cookie, it’s not very easy or fun for kids to work with. We like using buttercream… or perhaps I should call it fake buttercream- you know the fluffy kind bakeries ice their cakes with that is entirely unhealthy but still tasty! You can find our recipe here from a post we did several years ago!

Make your icing ahead of time and color it to your desired shades! We use AmeriColor food coloring in small amounts, or just keep the icing white!

You can also just purchase icing from your local bakery or grocery store!

Sprinkle it up! At our very first cookie party two year old Isola referred to the sprinkles as “toppers” and the name has kind of stuck with us! We like to find a variety of fun and unique sprinkles in the color palette of the party. We source our sprinkles from places like Williams Sonoma , Wilton  or Etsy!

Minimize the mess! We don’t mind kids making the mess, but if we can minimize the amount of clean up we have to do afterwards, it gives us more time to spend with our family versus being overwhelmed with clean up! Here are a few supplies that have come in handy for us:

  • Takeout containers with lids work great to quickly color and store your icing
  • Disposable decorating bags allows for quick clean up at the end
  • Icing bag ties  help keep the frosting in the decorating bag by tying off the end
  • Small cookie sheets for each kid to decorate on keep the sprinkles (mostly) contained
  • Paper souffle cups  are perfect for rationing sprinkles out to each kid ( this helps us avoid the whole sprinkle bottle from being poured out on just one cookie or kids fighting over which color of sprinkles they currently want to use!)

Standing higher! We get the kids closer to the action with the use of towers and stepping stools. We have a couple of  these learning towers that have been gifted to us. We love this brand because of the solid construction and that the towers are adjustable for different heights to accommodate various stages of childhood. Our step-stools are probably from Target- Nothing special, but great to have on hand!

Freedom and Fun! I love that our kids feel free to decorate their cookies however they want. We try to just let them explore and figure things out on their own unless they ask for help. I love seeing what they each come up with, what colors they prefer using and creating what they find beautiful in their little minds! The kids get so focused on what they are doing, and then are so proud of themselves for what they have created. Except for London. She’s just there to eat the cookies (with monitored consumption of course).

Take photos! It’s so crazy to think that Isola was only two years old when we made our first cookies together. Watching her grow into the young lady she is becoming has been a joy… she’s also developed some impressive cookie decorating skills since that first party. I wish I had photos from that first year. Watching how the kids have changed and developed from year to year is really special and the photos from this party each year are things I really treasure.

Get in on the Action! Parents deserve to have some fun too! When the kids are done and lose interest, take some time and create your own cookies… It will make you feel like a kid again! This is the first year that our kids were old enough to really go and play on their own in the adjoining room while we were able to have some decorating fun! Something tells me 10 years from now it will just be us decorating the cookies while the kids are off spending time with each other.


Tied up in String! The first year we decorated cookies together, we got to the end and I realized we didn’t have anything to package the cookies and send them home in. We are more prepared now, and have a variety of different bakery boxes that our friends can package their cookies up with, like these bakery boxes!  Having ribbon to tie up the package makes it special and festive! The velvet ribbon in the photos was a vintage find, but you can purchase similar ribbon from ETSY and the chunky yarn is from Michaels!

Life is better done together! The most important thing that I am reminded of every time we see our friends, is that life is better when we do it together. Our community is our support, encouragement and cheering squad through the ups and downs of life. Investing into the kind of friends that truly know your heart and allow you to just be yourself, and push you to be the best version of yourself is worth its weight in gold.  True friendship is hard to come by and is truly the best kind of gift you can receive in this world… although good cookies with some icing and “toppers” might be a close second!

Photography: Alanna Maria Photography 

10/40


How to Marry a Wedding Planner: Decorating Cookies

Three years ago, my college girlfriends started an annual Christmas tradition: a couples’ gingerbread house decorating contest. Each couple gets a freshly baked gingerbread house and a variety of toppings to work with. This event is kept to a strict time limit, and like any healthy competition, there tends to be some trash-talking amongst rival couples and bribery of the judges… all in good fun of course.

When Steve and I begin strategizing our decorating plan, we tend to a lot grief from our opponents. Things like, “This is not fair at all! This is what you two do for a living!”

Although neither of us had ever decorated a gingerbread house for a client’s wedding before, there is some fact behind those statements. Steve is obviously my not-so-secret weapon at the contest and I’d be lost without his icing skills. At times like these, it pays off to be married to someone who knows how to create beautiful work with a pastry bag.

Sinclair & Moore xmascookies 1Sinclair & Moore xmascookies 2

When he and I set out to make snowflake cookies, I envisioned myself piping out lovely, tiny intricate details. This daydream came to a halt when Steve told me he spent one entire summer just practicing piping. He’d spend hours upon hours creating designs on parchment paper just to practice his technique. All that practice paid off, and man, he sure makes it look easy!

I started my first few cookies with the intention of delicately icing them around the edges with some dots mixed in. Simple. Let’s just say my cookies ended up fully frosted and covered in sprinkles. It takes a steady and stable hand that I’m not used to. It makes me feel like a kindergartner, awkwardly practicing letters when my hand can’t quite do what my brain is telling it to do. Although after some practice, I have gotten a little better and have some pointers to share for making a successful batch of decorated Christmas cookies.

Sinclair & Moore xmascookies 3

1. Make your dough the day before if you can. Both gingerbread and sugar cookie dough should chill for at least 4 hours, but it is best if the dough can rest overnight.

2. If you are making the classic gingerbread dough, purchase 2 bottles of molasses. We didn’t realize we would need this much, and I had to return to the store mid-recipe. Annoying.

Sinclair & Moore xmascookies 4 Sinclair & Moore xmascookies 5

4. Divide your dough into small disks and wrap with plastic wrap. Smaller disks will make rolling out the cookies more manageable.

5. Only remove one cookie dough disk at a time from the fridge so that the rest can stay chilled.

Sinclair & Moore xmascookies 6

6.  If you don’t have a granite or marble countertop, try rolling out the cookies on a table covered in a vinyl cloth. My mother-in-law uses this technique and prefers it over a countertop.

Sinclair & Moore xmascookies 7 Sinclair & Moore xmascookies 8Sinclair & Moore xmascookies 9

7. Shape your disk into a ball and sprinkle a bit of flour on top before starting to roll out your dough.

8. As you roll, carefully lift your dough and sprinkle flour underneath. You don’t want too much flour because it will make your cookies dry, just enough so it won’t stick to the surface.

9. Roll out your dough so that it’s 1/4 of an inch thick. If the dough is much thicker, the cookies will lose their shape in the oven when they bake.

10. Be aggressive and press very firmly on your cookie cutter so that the entire shape is cut out from the dough.

Sinclair & Moore xmascookies 10 Sinclair & Moore xmascookies 11

11. Small cookies are easy to transfer from the counter to the cookie sheet, but larger ones can be a challenge. Using a large spatula covered in flour is the best technique that we have found. Also, work quickly before your dough warms up. The colder the dough, the easier it is for the cookies to to be transferred to the baking sheet.

Sinclair & Moore xmascookies 12 Sinclair & Moore xmascookies 13 Sinclair & Moore xmascookies 14 Sinclair & Moore xmascookies 15 Sinclair & Moore xmascookies 16

12. Keep an eye on your cookies while they’re baking. The longer they’re in the oven, the firmer and crispier they’ll be. Larger cookies, like our snowflakes, need to be fairly firm or they’ll crack when you try to decorate them.

Sinclair & Moore xmascookies 17 Sinclair & Moore xmascookies 18

13. Let your cookies cool for about 10 minutes before attempting to transfer them from the baking sheet to the wire cooling racks.

14. Let your cookies cool completely before you attempt to decorate them (otherwise it’ll be an oozy mess).

Sinclair & Moore xmascookies 19 Sinclair & Moore xmascookies 20

15. Ok – this is where we might lose some of you. Remember that decorating your cookies should be fun. Also remember that Steve has been using a piping bag since age 12 – he has had a ton of practice! You can use store bought icing or use the recipe we have below. Either way, have fun and experiment with special sugars, silver balls and sprinkles. If you want to try piping, check out this tutorial for a few techniques and tips.

Sinclair & Moore xmascookies 21 Sinclair & Moore xmascookies 22

Sinclair & Moore xmascookies 24 Sinclair & Moore xmascookies 25 Sinclair & Moore xmascookies 26 Sinclair & Moore xmascookies 27 Sinclair & Moore xmascookies 28 Sinclair & Moore xmascookies 29

17. If you don’t like how your cookie is looking (like the majority of mine), this is when I suggest to completely cover your cookie with crystalized sugar. This is as easy as frosting the entire cookie (to cover the mess-ups), and pouring sugar on top. You can’t go wrong with this technique!

Sinclair & Moore xmascookies 30 Sinclair & Moore xmascookies 31 Sinclair & Moore xmascookies 32 Sinclair & Moore xmascookies 33 Sinclair & Moore xmascookies 34

I think Steve and I have possibly started a new Christmas cookie tradition of our own – decorated snowflakes! I’m sure in a few years mine will look like the ones above – ha! What are your annual holiday baking traditions?


Download and print our recipes for Classic GingerBread Cookies and Icing

Photo Credit: Matthew Land Studios

Recipe Layout and Design: Spruce 

Classic Gingerbread Cookies Icing