Cinnamon Rolls

We are ending our Easter Brunch series with one last recipe to add to your menu. Cinnamon rolls are a crowd pleaser, and despite the multiple steps that may at first seem intimidating, they are relatively simple to make. Prepare them the night before, and then bake them the morning of your brunch.

Sinclair & Moore cinnamon roles 1 Sinclair & Moore cinnamon roles 2

Before you begin, make sure to gather fresh ingredients. It might be tempting to use flour and yeast that you have had in your pantry for the past year and a half. Throw it out and get fresh ingredients. It will make a difference. Old yeast could prevent your cinnamons rolls from rising. Also, I strongly recommend using bread flour rather than traditional flour. Bread flour will make a softer, more chewy roll.

Sinclair & Moore cinnamon roles 3

Wether I am making cookies, cakes or cinnamon rolls, I cream my butter and sugar together for at least 7 minutes. I find that this creates smoother and fluffier baked items in the end. I also like to use the extended time of creaming the butter and sugar to start measuring out all of the other ingredients.

Sinclair & Moore cinnamon roles 4 Sinclair & Moore cinnamon roles 5

Sinclair & Moore cinnamon roles 6

The first time I made cinnamon rolls and I added the water and yeast mixture, I thought I had ruined the dough and I almost started over. It looked like curdled milk and I was sure it would never come together and form a dough. This is normal, and what you want it to look like. Keep moving forward and add your dry ingredients. I promise it will come together.

Sinclair & Moore cinnamon roles 7Sinclair & Moore cinnamon roles 8

As the recipe indicates, you may not need to add the full amount of flour. You want to add only the amount of flour that it takes so your dough is not sticky. Adding too much flour will make your rolls very dry. Once you have added the appropriate amount of flour, turn your mixer to a low speed and let the machine do all the kneading for you. 15 minutes sounds like a long time, but it will add to the fluffiness of your rolls.

Sinclair & Moore cinnamon roles 9

I use a pastry brush to lightly coat a large mixing bowl with vegetable oil. It doesn’t take much. The oil just helps the dough not stick to the sides of the bowl while it rises. Makes sure to turn your dough around in the bowl so that the dough is also very light covered with the oil.

Sinclair & Moore cinnamon roles 10 Sinclair & Moore cinnamon roles 11

Cover the dough bowl with foil and let it rest in a warm spot for an hour and a half. Don’t rush this time. The dough needs to rise for this length of time before moving to the next steps.

Sinclair & Moore cinnamon roles 12

While the dough is rising, prepare your cinnamon sugar mixture and melt your butter.

Sinclair & Moore cinnamon roles 13

I found that it was helpful to lightly dust my work surface with flour before rolling out my dough. Start by shaping the dough into a rectangle with your hands before rolling it into a larger 12×18 inch rectangle.

Sinclair & Moore cinnamon roles 14 Sinclair & Moore cinnamon roles 15

When your dough is rolled to the proper size, generously butter the dough, but leave about a half inch strip of the dough unbuttered  on the long side of the rectangle that is furthest from you. This is hard to explain in words, so take a look at the photos to guide this step.Sinclair & Moore cinnamon roles 16 Sinclair & Moore cinnamon roles 17

Most cinnamon roll recipes tell you to roll the entire sheet of dough together, and then cut individual rolls. It seems like every time I have tried that, the big roll seems to split or I stretch the dough too far, or I can’t even roll it up at all. In my frustration one evening while making these rolls, I decided to cut individual strips and then individually construct each roll. Much more manageable and I had complete success.

If you want even smaller rolls than what I created, I would suggest cutting your dough in half lengthwise and then cut the individual strips and roll up your dough. This will make much smaller portions. (I didn’t have this idea until after this shoot- I’m doing this next time though!)

Sinclair & Moore cinnamon roles 18Sinclair & Moore cinnamon roles 21

Layer your baking sheet with parchment paper and generously butter the pan. Your dough will continue to rise overnight, so make sure to leave enough room between each roll on the pan, and then butter their sides so they are easier to pull apart after they bake.

Sinclair & Moore cinnamon roles 19 Sinclair & Moore cinnamon roles 22 Sinclair & Moore cinnamon roles 23 Sinclair & Moore cinnamon roles 24 Sinclair & Moore cinnamon roles 25 Sinclair & Moore cinnamon roles 26

Let them rise overnight in the refrigerator, but make sure to let them come to room temperature before baking them in the oven. Sinclair & Moore cinnamon roles 27 Sinclair & Moore cinnamon roles 28Sinclair & Moore cinnamon roles 29

The fluffy texture and soft nature of these rolls are amazing by themselves and they don’t even need any frosting. I actually regret that I smothered them in icing. Don’t get me wrong- the iced rolls are incredible too, but perhaps leave some without any icing and just enjoy the freshly baked roll in its natural form.

Sinclair & Moore cinnamon roles 30 Sinclair & Moore cinnamon roles 31 Sinclair & Moore cinnamon roles 32

recipe calligraphy and design:  la Happy

photography: Matthew Land Studios 

Sinclair & Moore cinnamon rolls 50

Red Velvet Cake

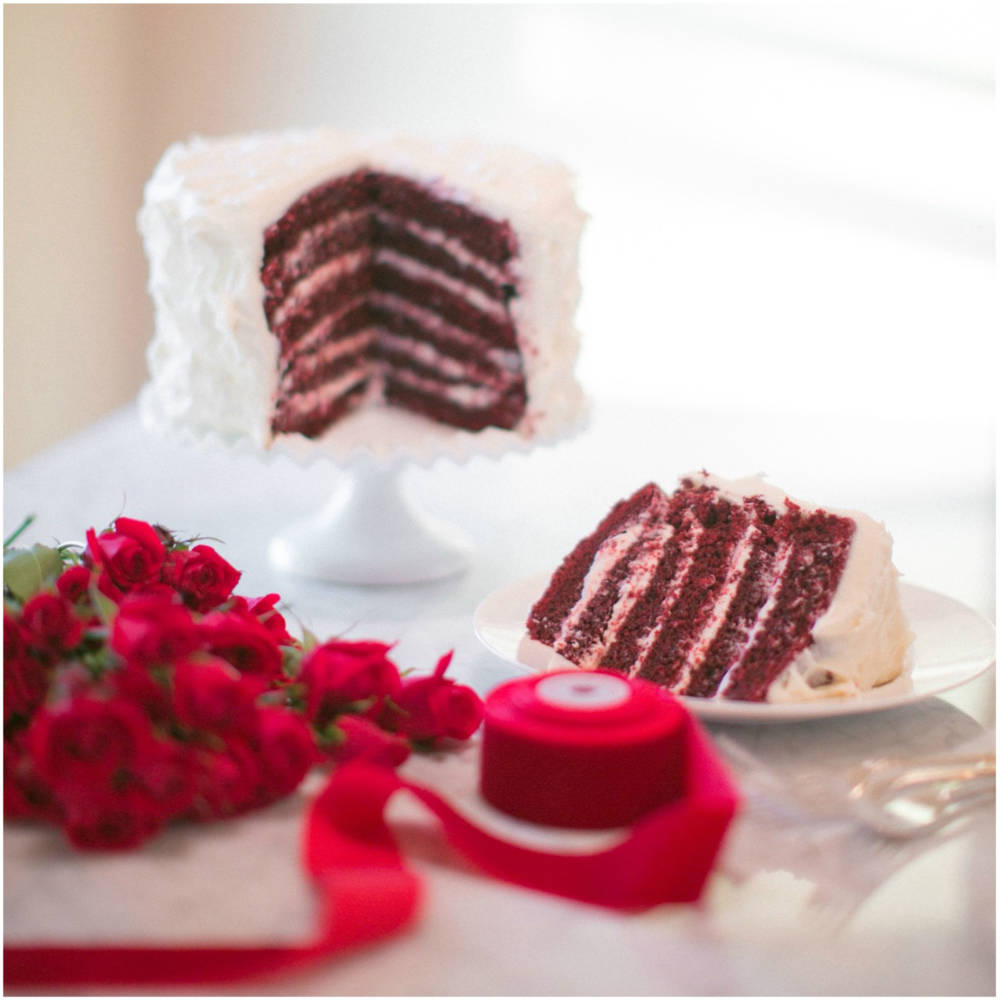
I think Valentine’s Day was my favorite holiday as a kid, mostly because of the homemade treats my mother baked to make the day special. She would make dozens and dozens of huge, heart shaped sugar cookies and then carefully ice each one with bright pink frosting. She would then finish each cookie by personalizing it for every kid in my class by writing their name on it. I was proud to hand those homemade treats out to my friends. Although most of the kids would carefully wrap their cookie up so they could take it home, I quickly ate mine because I knew that when I got home there would be a Valentine’s cake.

Sinclair & Moore Red Velvet Cake 1

Every year my mother would make the same cake… it was a white cake baked in a heart shaped pan and filled with cherries. She would ice it in the fluffiest white icing and then top it off with even more cherries forming the perfect red heart. Although it has been years since she has made this confection, I can still taste the slightly almond flavored treat like it was just yesterday.

Baking Valentine’s treats was my mother’s way to tangibly show us how much she loved us. That is why Valentine’s Day and baking go hand in hand for me.

Sinclair & Moore Red Velvet Cake 2 Sinclair & Moore Red Velvet Cake 3

Something else that goes hand in hand with Valentine’s Day is red velvet cake; it seems like it has become a quintessential part of this holiday for our generation. The recipe I have included below bakes one of the best red velvets I have ever had. I’ve included a few tips and pointers that I learned along the way to hopefully help you achieve baking success.

Sinclair & Moore Red Velvet Cake 4 Sinclair & Moore Red Velvet Cake 6

You will want to sift all of the dry ingredients together. I made the mistake of only sifting the flour. I thought the chocolate and baking powder would be a fine enough powder to not warrant any sifting. Wrong. My batter in the end was a bit lumpier than I would have liked as the clumps of chocolate were not breaking apart. I had to over-beat the batter to eliminate the chunks. Over-beating usually means a dry cake which nobody appreciates. Luckily for me my end results were not dry, but I could have avoided that risk all together if I had simply just sifted all of the dry ingredients.

Sinclair & Moore Red Velvet Cake 7Sinclair & Moore Red Velvet Cake 40Sinclair & Moore Red Velvet Cake 10

The recipe calls for a bit of coffee. Don’t skip this step thinking you won’t need it or don’t like the taste of coffee. I promise you that you won’t even taste it in the end. The coffee will make your cake very moist and is an important ingredient to this cake.

Sinclair & Moore Red Velvet Cake 11

The rich redness of a red velvet cake is more of a modern interpretation of this cake. Years ago, before cocoa powder was processed like it is today, there was more of a red quality that was naturally found in the chocolate. There was a chemical reaction between the white vinegar and the buttermilk that would draw out the red qualities in the chocolate when it was all combined. Our grandparents’ version of red velvet cake was merely just a chocolate cake, similar to devil’s food, that had hints of red running through it. People started adding red food coloring to the batter so that the appearance of the cake would measure up to its title.

It may disturb you to know the amount of color that is going into your cake, but it took four full bottles to achieve the rich iconic red velvet coloring that makes this cake famous.

Sinclair & Moore Red Velvet Cake 12

Be aware that the batter is very thin, and splashes very easily. Wear an apron or a shirt you do not care about because the colored batter will unfortunately ruin your clothes. Also, use a very large mixing bowl. I had to transfer bowls half way through making this cake, because my original bowl choice was not big enough.

When you incorporate the dry ingredients, you want to make sure you do this very intentionally. With the mixer turned off, add 1/3 of the flour mixture. Turn the mixture to low and mix just until incorporated. Turn the mixer back off, repeat the process. Once the last 1/3 of flour has been mixed on low, scrape the bowl and then turn the mixer to medium high and mix the cake for just a minute to make sure everything is well incorporated. Remember that over-mixing your batter will make a very dry cake.

Sinclair & Moore Red Velvet Cake 13 Sinclair & Moore Red Velvet Cake 14 Sinclair & Moore Red Velvet Cake 15

A well greased and floured pan is essential so that the cake can be easily released from the pan after it has baked. Greasing and flouring your pan can be tricky. I was pretty lucky to learn techniques from my mom who was a master at baking cakes. She taught me to use a bit of shortening on a paper towel, and generously yet smoothly make sure the entire inside of the pan is coated. You don’t want any Crisco lumps nor do you want any areas of the pan that are not completely coated with the shortening. Once coated, use about 2 TBS of flour to dust over all of the flour. Firmly tap the pan onto your counter to loosen all of the extra flour. Pour all excess flour out of the pan.

Sinclair & Moore Red Velvet Cake 16

Fill the pan 2/3 full of cake batter. It will take a full hour or more to bake, but you will end with a nice tall cake ready to be spilt  and filled.

Sinclair & Moore Red Velvet Cake 18 Sinclair & Moore Red Velvet Cake 19 Sinclair & Moore Red Velvet Cake 20 v1 Sinclair & Moore Red Velvet Cake 23

Let your cakes cool completely before leveling, filling and icing. Don’t be impatient or you will have a very big mess as the heat will cause your cake to split and your icing will melt.

Sinclair & Moore Red Velvet Cake 24

To fill and stack a cake, use the following method: Pipe a ring of icing around the perimeter edge of the cake. This ring will act as a dam so the filling will not squish out over the side. Fill the middle of the tier with with icing, and use an angled spatula to smooth and level, leaving the original outer ring in place. Repeat this process until your cake is fully stacked.

Sinclair & Moore Red Velvet Cake 26 Sinclair & Moore Red Velvet Cake 27 Sinclair & Moore Red Velvet Cake 28 Sinclair & Moore Red Velvet Cake 29

I ice cakes quickly with a large smooth edged decorating tip that forms wide bands of icing around the side and entire top of cake. Once this is completed, I use my angled spatula to evenly spread the icing and make large peaks or swirls.

Sinclair & Moore Red Velvet Cake 31 Sinclair & Moore Red Velvet Cake 32 Sinclair & Moore Red Velvet Cake 34 Sinclair & Moore Red Velvet Cake 35 Sinclair & Moore Red Velvet Cake 36  Sinclair & Moore Red Velvet Cake 38 Sinclair & Moore Red Velvet Cake 39 sinclairmoore_lahappy_red velvet cake-01sinclairmoore_lahappy_cream cheese icing-01

Download and print our recipe cards for Red Velvet Cake and Cream Cheese Icing

photo credit:  Matthew Land Studios

recipe card design and layout: la Happy


How to Marry a Wedding Planner: Decorating Cookies

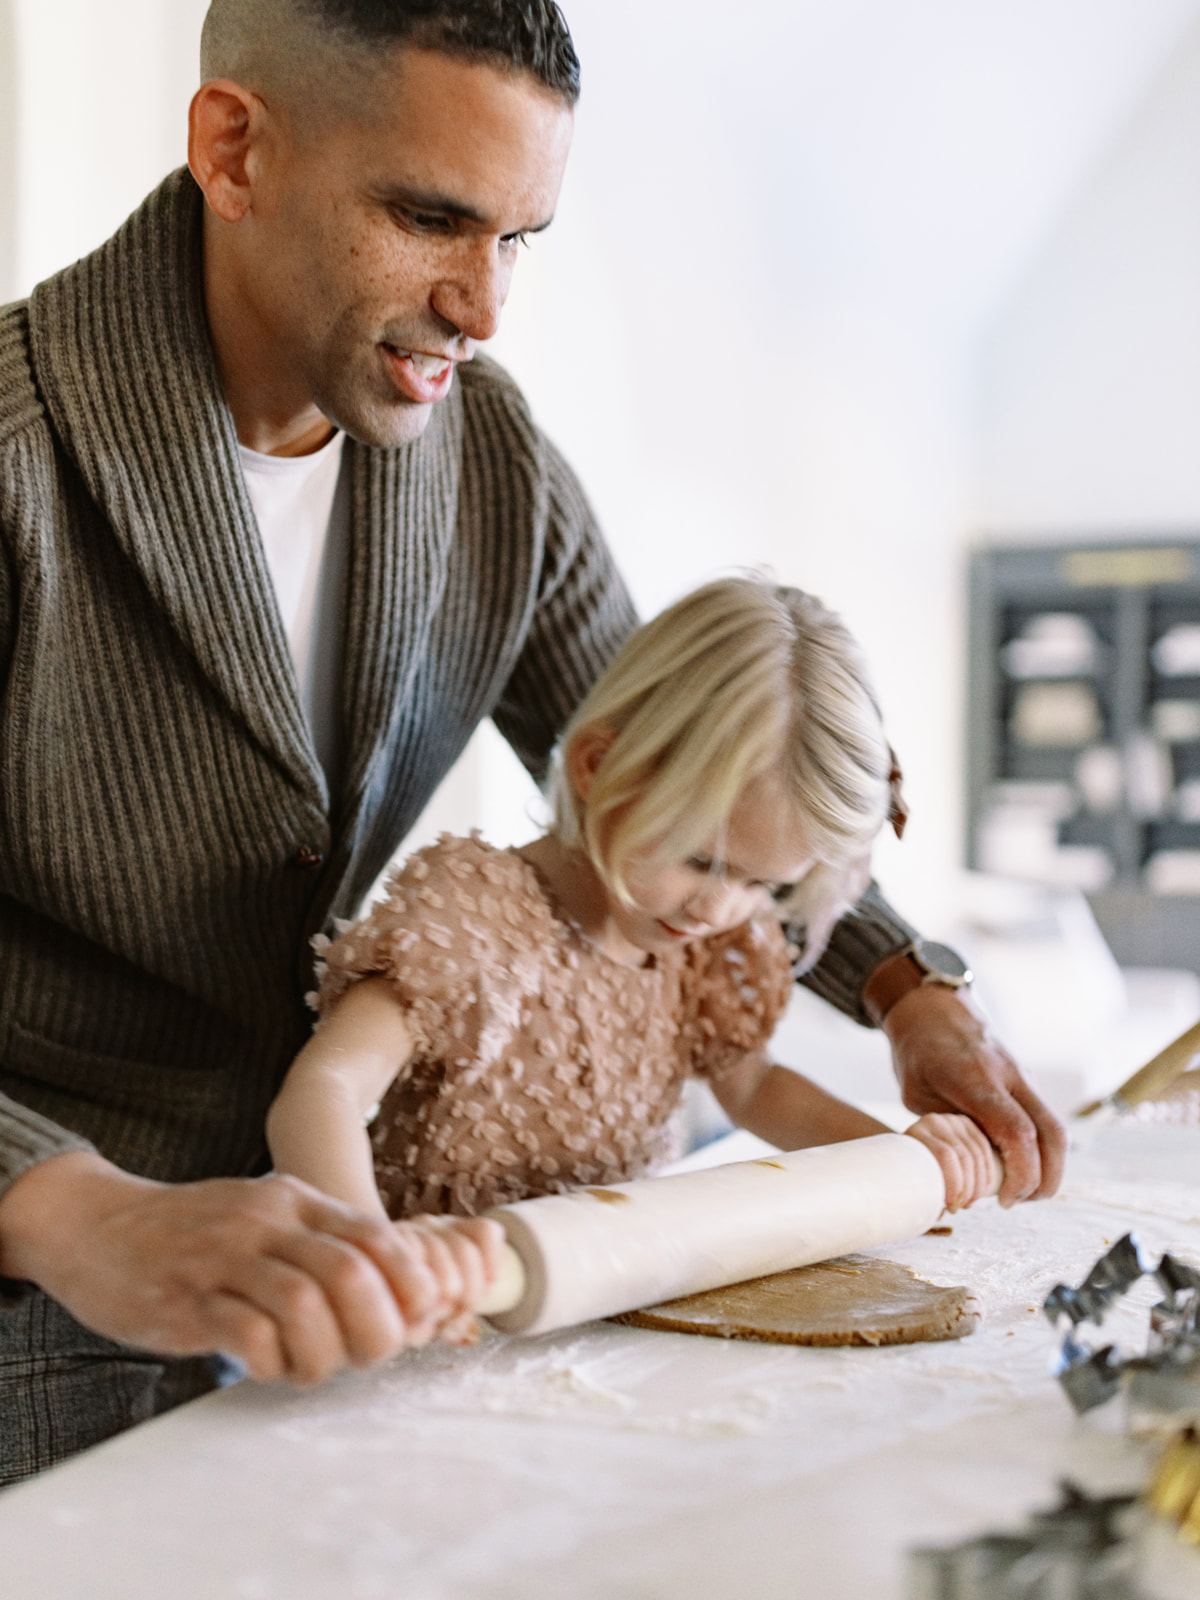
Three years ago, my college girlfriends started an annual Christmas tradition: a couples’ gingerbread house decorating contest. Each couple gets a freshly baked gingerbread house and a variety of toppings to work with. This event is kept to a strict time limit, and like any healthy competition, there tends to be some trash-talking amongst rival couples and bribery of the judges… all in good fun of course.

When Steve and I begin strategizing our decorating plan, we tend to a lot grief from our opponents. Things like, “This is not fair at all! This is what you two do for a living!”

Although neither of us had ever decorated a gingerbread house for a client’s wedding before, there is some fact behind those statements. Steve is obviously my not-so-secret weapon at the contest and I’d be lost without his icing skills. At times like these, it pays off to be married to someone who knows how to create beautiful work with a pastry bag.

Sinclair & Moore xmascookies 1Sinclair & Moore xmascookies 2

When he and I set out to make snowflake cookies, I envisioned myself piping out lovely, tiny intricate details. This daydream came to a halt when Steve told me he spent one entire summer just practicing piping. He’d spend hours upon hours creating designs on parchment paper just to practice his technique. All that practice paid off, and man, he sure makes it look easy!

I started my first few cookies with the intention of delicately icing them around the edges with some dots mixed in. Simple. Let’s just say my cookies ended up fully frosted and covered in sprinkles. It takes a steady and stable hand that I’m not used to. It makes me feel like a kindergartner, awkwardly practicing letters when my hand can’t quite do what my brain is telling it to do. Although after some practice, I have gotten a little better and have some pointers to share for making a successful batch of decorated Christmas cookies.

Sinclair & Moore xmascookies 3

1. Make your dough the day before if you can. Both gingerbread and sugar cookie dough should chill for at least 4 hours, but it is best if the dough can rest overnight.

2. If you are making the classic gingerbread dough, purchase 2 bottles of molasses. We didn’t realize we would need this much, and I had to return to the store mid-recipe. Annoying.

Sinclair & Moore xmascookies 4 Sinclair & Moore xmascookies 5

4. Divide your dough into small disks and wrap with plastic wrap. Smaller disks will make rolling out the cookies more manageable.

5. Only remove one cookie dough disk at a time from the fridge so that the rest can stay chilled.

Sinclair & Moore xmascookies 6

6.  If you don’t have a granite or marble countertop, try rolling out the cookies on a table covered in a vinyl cloth. My mother-in-law uses this technique and prefers it over a countertop.

Sinclair & Moore xmascookies 7 Sinclair & Moore xmascookies 8Sinclair & Moore xmascookies 9

7. Shape your disk into a ball and sprinkle a bit of flour on top before starting to roll out your dough.

8. As you roll, carefully lift your dough and sprinkle flour underneath. You don’t want too much flour because it will make your cookies dry, just enough so it won’t stick to the surface.

9. Roll out your dough so that it’s 1/4 of an inch thick. If the dough is much thicker, the cookies will lose their shape in the oven when they bake.

10. Be aggressive and press very firmly on your cookie cutter so that the entire shape is cut out from the dough.

Sinclair & Moore xmascookies 10 Sinclair & Moore xmascookies 11

11. Small cookies are easy to transfer from the counter to the cookie sheet, but larger ones can be a challenge. Using a large spatula covered in flour is the best technique that we have found. Also, work quickly before your dough warms up. The colder the dough, the easier it is for the cookies to to be transferred to the baking sheet.

Sinclair & Moore xmascookies 12 Sinclair & Moore xmascookies 13 Sinclair & Moore xmascookies 14 Sinclair & Moore xmascookies 15 Sinclair & Moore xmascookies 16

12. Keep an eye on your cookies while they’re baking. The longer they’re in the oven, the firmer and crispier they’ll be. Larger cookies, like our snowflakes, need to be fairly firm or they’ll crack when you try to decorate them.

Sinclair & Moore xmascookies 17 Sinclair & Moore xmascookies 18

13. Let your cookies cool for about 10 minutes before attempting to transfer them from the baking sheet to the wire cooling racks.

14. Let your cookies cool completely before you attempt to decorate them (otherwise it’ll be an oozy mess).

Sinclair & Moore xmascookies 19 Sinclair & Moore xmascookies 20

15. Ok – this is where we might lose some of you. Remember that decorating your cookies should be fun. Also remember that Steve has been using a piping bag since age 12 – he has had a ton of practice! You can use store bought icing or use the recipe we have below. Either way, have fun and experiment with special sugars, silver balls and sprinkles. If you want to try piping, check out this tutorial for a few techniques and tips.

Sinclair & Moore xmascookies 21 Sinclair & Moore xmascookies 22

Sinclair & Moore xmascookies 24 Sinclair & Moore xmascookies 25 Sinclair & Moore xmascookies 26 Sinclair & Moore xmascookies 27 Sinclair & Moore xmascookies 28 Sinclair & Moore xmascookies 29

17. If you don’t like how your cookie is looking (like the majority of mine), this is when I suggest to completely cover your cookie with crystalized sugar. This is as easy as frosting the entire cookie (to cover the mess-ups), and pouring sugar on top. You can’t go wrong with this technique!

Sinclair & Moore xmascookies 30 Sinclair & Moore xmascookies 31 Sinclair & Moore xmascookies 32 Sinclair & Moore xmascookies 33 Sinclair & Moore xmascookies 34

I think Steve and I have possibly started a new Christmas cookie tradition of our own – decorated snowflakes! I’m sure in a few years mine will look like the ones above – ha! What are your annual holiday baking traditions?


Download and print our recipes for Classic GingerBread Cookies and Icing

Photo Credit: Matthew Land Studios

Recipe Layout and Design: Spruce 

Classic Gingerbread Cookies Icing